Category Archives: Drawing

Contours

Learning Objectives

  1. Develop observational, compositional and conceptual problem-solving skills
  2. Demonstrate proficiency in the use of basic drawing media
  3. Demonstrate various drawing techniques
  4. Demonstrate the ability to critically assess works of visual art
  5. Demonstrate appropriate methods of presenting their finished work
  6. Demonstrate excellent time management and work ethic

Project Description

Students will start with a gesture drawing to refresh what they learned from the previous class.  I will go over the difference between a gesture (quick, mass, movement) and a contour (detail, slow, focused).  Students will complete several contour drawings of their hands in various positions as well as a few blind contours to demonstrate the idea of hand eye coordination.

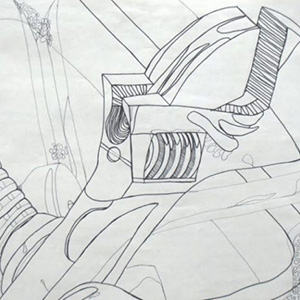
For the major portion of the project you will be completing 2 contour drawings in sharpie on white paper.

Project Considerations

Unlike a gesture drawing’s quick and intuitive process, contour drawings are slow and methodical. Contour drawings reinforce our hand eye coordination, much like playing video games.

Contour drawings can be frustrating because they are painstakingly slow, but the goal is to force us to slow down and really look at the objects we are drawing. Too often we draw the idea of a tree or the idea of a chair instead of the tree or chair that is in front of us. Contour drawings force us to focus on the specifics of the object in front of us.

A couple of tips – Take your time and enjoy the process. It is ok if you mess up; this assignment is about training out hands to coordinate with our eyes and it is hard. The more you practice, the better you will get.

Materials

  • Sketchbook
  • 2 sheets of 18” x 24” White Drawing Paper
  • Dual Fine and Ultra Fine Tip Sharpie Marker
  • Pencil
  • Still life objects

Directions

1. 5 gesture drawings of your chosen objects in your sketchbook (make sure to use a view finder so you can focus on good composition). You need at least 5 different compositions. You may need more depending on the composition.
2. 5 contour drawings of your hands and / or feet in your sketchbook.

For this assignment, you need to create 2 contour drawings. Using at least 5 still life objects, create 8 different compositions and sketch these compositions in your sketchbook. I will help you select the 3 best compositions. Remember to think about where your eyes are moving through the image. Are you stuck in the center, or are you creating enough focal points to allow the viewer to find interest throughout your drawing without creating the “kudzu” effect?

Once you have your good compositions selected, reset up your tool still life for each one.  Gesture the tools onto your large sheets of paper with a pencil, paying close attention to composition and technical accuracy.  Once these are gestured out you can start with contour drawings.  DO NOT TRACE YOUR GESTURE. DRAW FROM THE STILL LIFE; USE YOUR GESTURE ONLY AS A REFERENCE.  Create this drawing using a fine tipped Sharpie marker.  The drawing created on watercolor paper will be used for a value study assignment later in the semester.  The drawing on watercolor paper should be the best out of the three.

Remember…do not lift your pen when you start your contour.  Your eyes, along with your pen should visually trace the object.  It’s ok if you get out of proportion.  The goal of this assignment is to train yourself to focus on the details.  If you choose a hammer, draw THAT hammer, not your understanding or mental image of a hammer.  Draw that specific hammer with all its flaws and distinct characteristics.


Examples / Research:

Jim Dine
Cy Twombly

Combination

Learning Objectives

Students will be able to produce a cohesive work of art from a variety of source materials using different types of media. Students will be able to demonstrate competency in how they use their chosen media and in the arrangement of their composition.

Materials

3′ x 4′ masonite or panel board (3/16″ thick)
Your choice of – Colored Pencils, Colored Markers, Colored Inks, Oil and/or Chalk Pastels, Acrylic or Watercolor as a base for other drawing materials, Graphite

Homework

Research Surrealism
Work in Sketchbook

Process

Complete one large drawing (3 x 4 feet minimum) with numerous small studies/preliminary works. This assignment is in many ways about trying to combine (and or collage) as many types of styles, images and sensibilities as possible but in a unified manner that is both complex and unique. These styles, images and sensibilities should come from a variety of cultural, historical and contemporary contexts.

Image sources in the Combination Assignment should include a combinations of all points listed below:
1) representational (realistic) drawing from observation
2) abstraction and mark making
3) pop art styles and advertising
4) graphic design and or illustration drawing styles
5) drafted diagrams and or drawn images of objects, or machines, or architecture
6) drawing that interprets media imagery from television, movies, magazines and the internet (interpretation of lens based mediums such as photography, video, and film)
7) drawing styles and images from art history, or folk art or arts and crafts
8) drawing that present imagery and styles of drawing from non western cultures such as Asian, African, South American or Aboriginal cultures

The purpose of the studies is to assist you in the investigation of this assignment. The studies are not about making something small and then duplicating that small study at a large scale. Instead the studies and the larger work should feed off each other. During the process there should be a back and forth of working between the studies and the large work (especially at the beginning stages of the drawing). Studies may include manipulations of digital photos of the large work taken while in progress.

In general it is strongly recommended that you photograph the work in progress and periodically make some inexpensive prints at home to work on in order to consider all potential directions to develop the work. Experiment and investigate various options thoroughly with the studies and the large work.

Considerations

Avoid having every formal and conceptual component of your drawing pre-planned or “figured out” before you begin. This will eventually suffocate any desire to work, because it is almost impossible to pre-plan every step in the process and get positive results. If you are stuck with no ideas it is best to immediately start drawing with vague ideas and some random organic and geometric shapes such as in some of the examples posted below. Prepare yourself mentally for a process of risk, unexpected direction, layering, reworking, researching, making small preliminary works, applying criticism, and experimentation and you will have a very successful work or series of works.

Resources

John Cage and Leo Steinberg on Art of Robert Rauschenberg
PBS American Masters: Robert Rauschenberg
Ink Jet Image Transfer
YouTube Video on Ink Jet Transfer
Matthew Ritchie
Kojo Griffin
David Salle (contains adult content)
Jeff Koons (contains adult content)

Collaged Space

Learning Objectives

Project Description

Create a complex composition that references and re-configures the “macro and micro” elements of Todd Hall in a new invented space. Incorporate 1-2 samples of linear perspective to create the illusion of deep space within your final drawing. Use charcoal media to produce a full range of light-dark value to illustrate light sources and model various surfaces of collaged elements.

Materials

Access to digital camera (phone fine), sketchbook, scissors, gluestick/tape, charcoal media, 18”x24” drawing paper. (OPTIONAL: Digital collage/app collage software)

Directions

This assignment must be completed in several stages. 

  1. Collect at least 10 digital photos of interior spaces (floor to ceiling!) and 10 photos of small elements/fixtures from any space in the Todd building. Think about capturing the macro spaces (hallways & large interior spaces) & micro-elements (lights, faucets, pipes, etc…) you find in the building.
  2. Filter your photographed elements and spaces down to a few choices. NOT ALL ELEMENTS HAVE TO BE USED!
  3. Collage these photos in to a new composition—cut & glued photos OR digital collage is fine. NOTE: Collage elements can & should be resized, repeated “fused” with other elements to make the composition work. Negative spaces can be filled with found textures and gradients. When you arrive at a successful solution, print or photocopy your results to use as a reference.
  4. Enlarge your sketch collage into a new drawing incorporates a range of value & emphasizes surface textures using charcoal as your primary drawing media.  REMEMBER: Your drawing paper should be proportionate to your collage. For example a 6”x 8” collage would = an 18”x 24” drawing. Tape the border of your paper evenly!

Examples

5 Media, 5 Drawings, 5 Toys

Learning Objectives:
Students will continue to develop techniques with the media and materials they have used over the course of the semester.  Students are encouraged to explore new combinations and methodology when using the media.


Materials:
White Paper (Minimum size is 12″ by 18″, Max is 18″ by 24″)
Charcoal
Graphite
Ink
Sharpie
Colored Pencil
Conte


Time:
3 Classes


Homework:
Work out sketches in your sketchbook


Info:
The goal in creating 5 new drawings in such a short amount of time is to encourage creative thinking and challenge preconceptions of media use.  I encourage you to combine, alter and/or completely use whatever media you choose “incorrectly”. Explore the possibilities of the media.  Each drawing should be rendered with attention to detail.  Craftsmanship is very important.  Think about composition and background; it’s usually not a good idea to simply make one up.  Think about where your toys are in space.  Don’t let them “float”.

2 Focal Points

Learning Objectives

Project Description

For this assignment you will complete 2 drawings with identical compositions. Each drawing must reflect different focal point(s) within the composition through use of shading and/or other expressive mark making.

You are responsible for selecting objects and a composition to work with.  Fabric and other natural/organic forms may be the most interesting types of objects.  Your composition should be an open form composition, i.e. cropped on all sides.

*You may photograph your composition to work from in the classroom.

Project Considerations

You are responsible for selecting objects and a composition to work with. Your composition must:

  • Contain 3-5 varying objects (natural/organic forms may be the most interesting types of objects)
  • Set your objects on a fabric background that is cropped—i.e. no empty, void space!

*You may photograph your composition to work from in the classroom.

Materials

For each drawing–

  • 9”x12” white drawing paper
  • Graphite pencils (experiment with full range of graphite softness H-B)
  • Use of shading, line weight variations to emphasize the different focal points in each open-form composition
  • Remember to consider your subordinated areas—don’t leave them incomplete!  They are still important to the composition and should be complete, just de-emphasized

Examples

Focal Point #1                                                     Focal Point #2